New Large Indoor Red-foot Habitat

Status
Not open for further replies.

Madkins007

Well-Known Member
Moderator
10 Year Member!
Joined
Feb 15, 2008
Messages
5,393
Location (City and/or State)
Nebraska
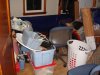
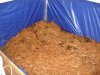
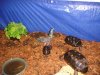
I had intended to get this done some time ago, but we were holding the room in case one of the kids came back home, and it is still has several tubs of my youngest's stuff. Getting the area cleaned up was probably the hardest part of the project- I hope!

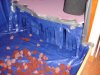
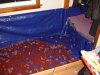
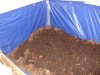
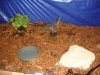
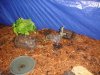
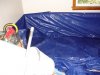
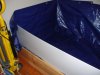
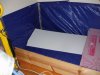
The space will be about 118" long by about 45" wide, with the last 24" or so being inside the closet, which will become the hiding space. The plan is to make a 'bathtub' on top of a layer of rigid foam board (shown in place in the photo). A heavy blue tarp will be spread over the floor and up about 12" of the each wall and be secured in place. A 20" wall across the front will keep the torts in place and keep the dog out (who will not be allowed in the room anyway.)

I'll discuss the more specific plans for environmental controls, etc. as they are closer to being put in place (the plans might change a lot by then!)

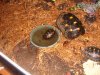
For right now, the space is cleaned up and the pink rigid foam is in place. Also in the photo you see a long plank made from a few sections of hardwood flooring that I was trying as a front wall, but it will not be strong enough, so to Plan B for that. The square of plywood is for me to stand on so I don't dent the foam too much. It will remain under the tarp to give me a safe standing place inside the habitat.

The room is not big enough to get the whole thing in one shot (at least not until more of the junk is gone).

Next photo should be when I get the 'bathtub' installed.
 

Attachments

  • DSC09373.JPG
    DSC09373.JPG
    31.7 KB · Views: 383

Yvonne G

Old Timer
TFO Admin
10 Year Member!
Platinum Tortoise Club
Joined
Jan 23, 2008
Messages
93,450
Location (City and/or State)
Clovis, CA
Looks like you've got your work cut out for you! But it will be a great over-wintering habitat for your redfoots when completed. And nice and large!

Yvonne
 

terryo

Well-Known Member
10 Year Member!
Joined
Aug 24, 2007
Messages
8,975
Location (City and/or State)
Staten Island, New York
THAT is going to be great! I always dreamed of a gym in one of my rooms...but they kept coming back home...or a grandkid moved in for a while...no gym for me...or tortoise room either...lol I can't wait to see the finished "tort room".
 

Madkins007

Well-Known Member
Moderator
10 Year Member!
Joined
Feb 15, 2008
Messages
5,393
Location (City and/or State)
Nebraska
Its not going to be a tortoise room so much as a tortoise den- the tortoise habitat is about 1/3rd-1/4th of the room. We are looking to use the rest of the room as a warm retreat in the winter... if we can fit a couple things into it.

Big score yesterday! I was originally planning the 20"x93" 'front wall' to be single piece of plywood or MDF, but was hoping to find something nicer looking. A co-worker suggested flooring planks, and I found a box for about $25- but they are not fastening together rigidly enough, so I'd have to back the wall up. Yuck.

Online, I found the C&C cage for guinea pigs- Cubes and Coroplast (a corrugated plastic). I've used Coroplast and similar materials, but had not found it locally in big enough sizes for this job. A C&C site included local vendors, and I found a local sign company that cut me a 20x94" piece for under $15!

I'll use a piece of 1x8" pine I already have for the front/structural part of the wall, and back it with the Coroplast for height, visual barrier, and humidity resistance. This should be sweet!

Hopefully, tonight begins the installation of the bathtub lining.
 

Madkins007

Well-Known Member
Moderator
10 Year Member!
Joined
Feb 15, 2008
Messages
5,393
Location (City and/or State)
Nebraska
Update: I am pretty much done with the structural phase. The bathtub lining is up, the support of the front wall is secured, and the pieces for the hide top and 'inner' front wall are cut.

The photos are not great- the room still has a lot of my son's stuff in it so I only have a small workspace.

Photo 1 shows the blue bathtub liner up on most of the walls, untrimmed. I got a 16'x12' tarp for the roughly 10x4 habitat, so there is a lot of left-over even after running it about 24" up the back and side walls. The liner is stapled to the wall for easy removal. If it becomes necessary, I will nail some lathe boards over the top edge for more strength.

Photo 2 shows the liner roughly trimmed, and shows the white front wall backer made of 20" high Coroplast. It is not strong by itself, so it is supported by the 1x8" board shown at the bottom.

Photo 3 shows the white board moved for easier work, and part of the pink board that will serve as the top of the 20"x36" hide on one end (inside the closet).

Now, to clean up the construction mess, and prepare for the next phase- substrate. This is going to be a pain I suspect!
 

Attachments

  • DSC09386.JPG
    DSC09386.JPG
    51.6 KB · Views: 161
  • DSC09390.JPG
    DSC09390.JPG
    42 KB · Views: 141
  • DSC09394.JPG
    DSC09394.JPG
    46.9 KB · Views: 150

Madkins007

Well-Known Member
Moderator
10 Year Member!
Joined
Feb 15, 2008
Messages
5,393
Location (City and/or State)
Nebraska
Latest additions:

Pic 1 is the hide. It is in the closet, and is about 40" x 23" (Bigger than the main habitat for my big guys right now!). It is just a piece of rigid foam board resting on cleats about 16-18" off the ground, with a fringed-up piece of blue plastic 'curtain' duct-taped on the front. It will be filled with Mosser Lee moss, and supplementally warmed by a waterproof seedling heating mat attached to one wall. (I'm figuring that in a 40" wide space, it will create a warm area on its side, and a cooler space on the other side. The mat only gets to 90F on the surface.

We've also kicked on the furnace, so the room should get up to about 85F overall, taking care of about 85% of my heating needs. (I am figuring I'll need a supplemental heater in the closet/hide since it is pretty insulated from the room and shares 2 walls with the outside. I am also going to hang a ceramic emitter in the hot zone, etc.)

Pic 2 is the first layer of substrate- 1.5 cubic feet of lava rock. Its job it to create air pockets and hold beneficial bacteria for at least some composting in the soil layer. It should also create a sort of reservoir so water can gather and evaporate/wick upwards for humidity. I'm going to move it away from the designated 'stand here' spot in the middle so if I step in the pen it won't hurt the liner.

Pic 3 is a photo of the room. My son has still not moved his stuff out, so I am trying to work in a narrow corridor to reach this space. Sigh. (Of course,my construction waste is not part of the problem! :) )

Next, and hopefully tomorrow- mixing/moistening/warming the soil layer, adding the top layer, and putting in the hide moss. When this is all done and the temps are where I want them, they will be ready to move in!
 

Attachments

  • DSC09395.JPG
    DSC09395.JPG
    50.7 KB · Views: 133
  • DSC09396.JPG
    DSC09396.JPG
    60.8 KB · Views: 134
  • DSC09397.JPG
    DSC09397.JPG
    54.7 KB · Views: 139

fishtanker

New Member
5 Year Member
Joined
Sep 13, 2009
Messages
46
That looks like a nice place for your gang to hang out in the winter. I love to see when people do what is right for their torts.
 

Madkins007

Well-Known Member
Moderator
10 Year Member!
Joined
Feb 15, 2008
Messages
5,393
Location (City and/or State)
Nebraska
The attached photos show the latest changes...

Photo 1 shows the soil layer in place (3 bags of clean, organic topsoil, a big bag of shreddeed sphagnum moss, a bag of hardwood mulch, and most of a bag of sand. The photo focuses on a hill in the far back corner.

Photo 2 shows the shredded Cypress mulch on top. One bag took care of it. There are also, at this point, three bags of dampened Mosser Lee in the hide on the opposite end. The hide has a supplemental heating pad attached to one wall to offset the fact that it shares outside walls and is partially insulated from the rest of the room.

Photo 3 shows the 'activity area' in the middle of the space- water saucer, a couple live plants, and a flat rock. To the left is the hill, to the right is the hide.

By this time, I have added about 3-4 gallons of water to the soil, and misted the place heavily with warm water. A 'shop heater' with a thermostat is proving supplemental heat to the room to keep it at 80-85 overall.

MOVING DAY! I could not keep them in the other small habitats any more. Within minutes of transferring the herd, I was enjoying several naturalistic behaviors.

Photo 1 (or 4 if this adds to the previous post) shows a couple of them wandering around. The big one is Oscar, at 10"SCL and Mylo (almost 8" SCL) is along the back wall.

#2 (or 5) shows Oscar, Mylo and one of my young'uns, Rana at 6" SCL exploring the hide area.

#3 (6?) shows my littlest, Quip (4.5"SCL) soaking as Oscar walks past.

#4/7 shows Quip eating the Flowering Kale I planted as Oscar and Pele, my 8.25" pyramided when I got him male, continue exploring.

#5/8 is Mylo taking a big drink, head fully submerged. You can see a little of Mylo's mottling, but since I was misting part of the pen at the time, the water is making a dark/light pattern that hides most of it. Or, you WOULD see it but apparently I have exceeded the allotment.

NEXT: Hot spots, more plants, and a secondary hide or two.

fishtanker said:
That looks like a nice place for your gang to hang out in the winter. I love to see when people do what is right for their torts.

Thanks! So, how do you house your dozen or so in the winter?

fishtanker said:
That looks like a nice place for your gang to hang out in the winter. I love to see when people do what is right for their torts.

Thanks! So, how do you house your dozen or so in the winter?
 

Attachments

  • DSC09400.JPG
    DSC09400.JPG
    68.1 KB · Views: 118
  • DSC09401.JPG
    DSC09401.JPG
    68.9 KB · Views: 92
  • DSC09403.JPG
    DSC09403.JPG
    69.5 KB · Views: 90
  • DSC09406.JPG
    DSC09406.JPG
    80.8 KB · Views: 93
  • DSC09409.JPG
    DSC09409.JPG
    98.7 KB · Views: 94
  • DSC09410.JPG
    DSC09410.JPG
    114.8 KB · Views: 102
  • DSC09411.JPG
    DSC09411.JPG
    79.6 KB · Views: 120

Yvonne G

Old Timer
TFO Admin
10 Year Member!
Platinum Tortoise Club
Joined
Jan 23, 2008
Messages
93,450
Location (City and/or State)
Clovis, CA
That's great! I have to admit, when you first started, I wasn't real sure about the blue tarp liner, but you were able to straighten it out real nice. The tortoises are going to be very happy in there for the winter!

Yvonne

(In the picture with all your son's stuff...looks like he has my hoarding problem!!:))
 

Isa

Active Member
10 Year Member!
Joined
Apr 8, 2008
Messages
7,095
Location (City and/or State)
Montreal, QC, Canada
Really nice enclosure! You did a very good job and I am sure your torts are super happy :)
 

Madkins007

Well-Known Member
Moderator
10 Year Member!
Joined
Feb 15, 2008
Messages
5,393
Location (City and/or State)
Nebraska
emysemys said:
That's great! I have to admit, when you first started, I wasn't real sure about the blue tarp liner, but you were able to straighten it out real nice. The tortoises are going to be very happy in there for the winter!

Yvonne

(In the picture with all your son's stuff...looks like he has my hoarding problem!!:))

Yeah, the blue tarp was not my first choice, but the economics of scale forced me to look for a cheaper solution than I was going to use originally. We'll see how it holds up!

Isa and Terryo- thanks!

They went in on Wednesday night, and Friday morning they were looking like old timers in there!
 
Status
Not open for further replies.

New Posts

Top