Quick
Member
Hi Tortoise Community,
The time has come for my little Quick, who is fast becoming big Quick, to leave home ? She had outgrown her closed chamber and was in need of an upgrade. I was considering the idea of using a grow tent (some of the examples on this forum are excellent) but whilst discussing my new conquest during a family dinner, both my Brother and Step-Dad were quick to reassure me that they will build me something suitable. I should say at this point that they’re both builders professionally … there was a reason that I decided to ‘casually’ share my concerns during their company ?
So I thought I would share with you all what we have achieved …
Step 1: laying a concrete base.
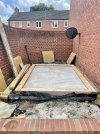
There’s a redundant piece of land at the side of my house which is perfect for an outdoors tortoise home. It sits snug against the house for a little added protection against rain and strong winds and during the hotter summer months the house provides some much needed shade to prevent it from over heating.
The base measures 8ftx6ft. We could have pushed it a little bigger in both width and length to max out the space, but I felt it was important to be able to fit around the side and back of the structure for maintenance and to monitor any potential damage and leaks etc. Patio slabs will be laid to the front of the enclosure so that the floor is level with the wall.
It’s worth mentioning at this point that I live on the edge of the countryside and although semi-rural, our area does attract a lot of wildlife and potential nocturnal predators. Whilst we are very fortunate that our garden is entirely enclosed by a large brick wall (so Quick will never be able to escape) I wouldn’t want to leave her outside fully during the warmer months due to fear of predator attacks. I was inspired to build my enclosure from @Tom night boxes. But my structure needed to be a little more substantial due to the heating requirements during our cold, winter months. So think of this enclosure as Quick’s ‘winter home’. During the warmer months, I intend to build a night box just like Tom’s where I can lock her safely away at night but she can roam freely during the day.
Anyway, I digress. Where was I? Ah yes …
Step 2: building the bloody thing!
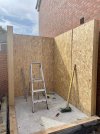
My main concern was insulation. I wanted it well insulated to retain the heat without costing a fortunate to run, especially when the temperatures drop during winter. The benefit of having family in a professional trade is that they have access to industrial materials. These insulation sheets were enormous!! Measuring 120mm thick, they were sandwiched between sheets of ply and erected in panels. These panels were used to construct all four walls, the ceiling AND floor!
The height of the structure was dictated by the UPVC door I had purchased. Although not ideal being this tall, I wanted a proper door for security and to prevent drafts and loss of heat.
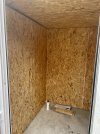
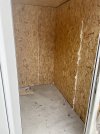
I forgot to take a photo of the flooring down but we constructed it from similar panels as the walls and ceiling …
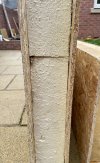
This picture demonstrates the thickness of the insulation that we used.
So now I had something that resembled a house, albeit a very unsightly one …
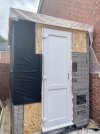
Step 3: make me beautiful. Commence “make over” to prevent the neighbours from complaining!!
… I wouldn’t have blamed them, it really was unsightly at this stage. And I wanted something to protect the outside and integrity of the structure. So we opted for a fibre cement cladding.
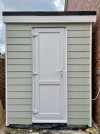
Now for all the fun bits …
Step 4: designing the indoor space.
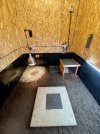
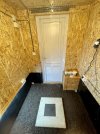
I started by lining the floor and 50cm up each wall with a 3mm rubber matting, similar to those you see in horse stables or gym floors (thank you @Yvonne for this inspiration!) This will provide further insulation, comfort, and make it easier for me to wipe down and keep clean. I’m currently using soil/dirt as the main substrate throughout.
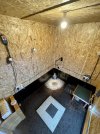
I then boxed in my oil filled radiator using the slats of an old bed. They were perfect because they are not too thick but strong. I spaced each of them 2mm apart to encourage heat flow. The radiator I have chosen has three different heat settings so I can adjust the wattage as necessary when the outside temperatures change. I control this using a Inkbird thermostat to maintain an ambient temperature of 26c.
I purchased and modified a medium sized rabbit hutch for Quick to retreat and sleep in at night. For additional reassurance, I have mounted a Habistat Reptile Radiator (75w) to the ceiling which I control using a pulsed proportional thermostat which will click on if for any reason the ambient temperature drops. I have covered the door to this hutch with thick, plastic drapes which keep both the heat and humidity inside. I use a different substrate in her hutch to encourage and maintain humidity above 80%.
I am currently using a 50w flood bulb for basking which maintains her basking temperatures perfectly around 31-32c … I had originally purchased a 100w but this was far too powerful. Similarly, even the 75w bulb was too strong but again this is something I will monitor as the seasons change. I have mounted her basking light so I can adjust the height as she grows.
I have also mounted a UV bulb along the length of one wall due to the length of time she is likely to be indoors (because of how long our winters last here in the UK). Both this and her basking bulbs are on 12 hour timers and are active between 07:00-19:00.
I purchased thick, industrial plastic strips to cover the door to help keep in the heat for when I’m gaining access to attend to her. These are similar to the ones you find in large freezers. They’re fantastic, I really recommend them. They were purchased on eBay.
I’ve placed a concrete patio slab in the centre of the enclosure to feed her on which will help to keep her beak and claws trim. I place the food in a plant saucer to help keep this hygienic because the concrete slab would be difficult to clean. Water is provided in a similar saucer, and I’ve littered some grey slate beneath her basking spot which she loves sitting on because they retain heat and contribute warmth from beneath.
***drum roll please***
Here is the finished product …
Stage 5: Introduction.
So after 8 weeks of building and putting this together, and the countless hundreds of pounds I have spent, anyone experienced with tortoise will accurately predict what happened when I eventually introduced Quick to her new home … that’s right, she sulked. I did not see her for a solid week ?
With patience, gentle coaxing to her food and daily bathing, she eventually came out of her shell … ? thank you, I’m here all week!
I am pleased to say that after much exploration and curiosity, she seems to love her new digs. I have my happy, inquisitive and greedy little tortoise back ?
From my perspective, I am super impressed with how well it has performed maintaining my desired temperatures with minimal effort. So my advice for anyone looking to build an outdoor heated enclosure in a cold climate … INSULATE! And insulate well. I promise it will pay off in the long run
I am considering making a few adaptations I initially rejected the idea of a window pane in the door because I didn’t want to lose heat, but actually the structure copes so well that I don’t think it will matter. Especially if I invest in a double/triple glazed panel. I don’t like the idea of her not having any natural light so I this is definitely something I will do.
Anyway, apologies for the long post but if you’re anything like me, I enjoy seeing the different ways people house their tortoises - especially when faced with the challenges of varying climates.
As always, a huge thank you to all the experienced keepers on this forum that regularly give their time and expertise to the community. Both Quick and I are thankful ?
The time has come for my little Quick, who is fast becoming big Quick, to leave home ? She had outgrown her closed chamber and was in need of an upgrade. I was considering the idea of using a grow tent (some of the examples on this forum are excellent) but whilst discussing my new conquest during a family dinner, both my Brother and Step-Dad were quick to reassure me that they will build me something suitable. I should say at this point that they’re both builders professionally … there was a reason that I decided to ‘casually’ share my concerns during their company ?
So I thought I would share with you all what we have achieved …
Step 1: laying a concrete base.

There’s a redundant piece of land at the side of my house which is perfect for an outdoors tortoise home. It sits snug against the house for a little added protection against rain and strong winds and during the hotter summer months the house provides some much needed shade to prevent it from over heating.
The base measures 8ftx6ft. We could have pushed it a little bigger in both width and length to max out the space, but I felt it was important to be able to fit around the side and back of the structure for maintenance and to monitor any potential damage and leaks etc. Patio slabs will be laid to the front of the enclosure so that the floor is level with the wall.
It’s worth mentioning at this point that I live on the edge of the countryside and although semi-rural, our area does attract a lot of wildlife and potential nocturnal predators. Whilst we are very fortunate that our garden is entirely enclosed by a large brick wall (so Quick will never be able to escape) I wouldn’t want to leave her outside fully during the warmer months due to fear of predator attacks. I was inspired to build my enclosure from @Tom night boxes. But my structure needed to be a little more substantial due to the heating requirements during our cold, winter months. So think of this enclosure as Quick’s ‘winter home’. During the warmer months, I intend to build a night box just like Tom’s where I can lock her safely away at night but she can roam freely during the day.
Anyway, I digress. Where was I? Ah yes …
Step 2: building the bloody thing!

My main concern was insulation. I wanted it well insulated to retain the heat without costing a fortunate to run, especially when the temperatures drop during winter. The benefit of having family in a professional trade is that they have access to industrial materials. These insulation sheets were enormous!! Measuring 120mm thick, they were sandwiched between sheets of ply and erected in panels. These panels were used to construct all four walls, the ceiling AND floor!
The height of the structure was dictated by the UPVC door I had purchased. Although not ideal being this tall, I wanted a proper door for security and to prevent drafts and loss of heat.


I forgot to take a photo of the flooring down but we constructed it from similar panels as the walls and ceiling …

This picture demonstrates the thickness of the insulation that we used.
So now I had something that resembled a house, albeit a very unsightly one …

Step 3: make me beautiful. Commence “make over” to prevent the neighbours from complaining!!
… I wouldn’t have blamed them, it really was unsightly at this stage. And I wanted something to protect the outside and integrity of the structure. So we opted for a fibre cement cladding.

Now for all the fun bits …
Step 4: designing the indoor space.
I started by lining the floor and 50cm up each wall with a 3mm rubber matting, similar to those you see in horse stables or gym floors (thank you @Yvonne for this inspiration!) This will provide further insulation, comfort, and make it easier for me to wipe down and keep clean. I’m currently using soil/dirt as the main substrate throughout.
I then boxed in my oil filled radiator using the slats of an old bed. They were perfect because they are not too thick but strong. I spaced each of them 2mm apart to encourage heat flow. The radiator I have chosen has three different heat settings so I can adjust the wattage as necessary when the outside temperatures change. I control this using a Inkbird thermostat to maintain an ambient temperature of 26c.
I purchased and modified a medium sized rabbit hutch for Quick to retreat and sleep in at night. For additional reassurance, I have mounted a Habistat Reptile Radiator (75w) to the ceiling which I control using a pulsed proportional thermostat which will click on if for any reason the ambient temperature drops. I have covered the door to this hutch with thick, plastic drapes which keep both the heat and humidity inside. I use a different substrate in her hutch to encourage and maintain humidity above 80%.
I am currently using a 50w flood bulb for basking which maintains her basking temperatures perfectly around 31-32c … I had originally purchased a 100w but this was far too powerful. Similarly, even the 75w bulb was too strong but again this is something I will monitor as the seasons change. I have mounted her basking light so I can adjust the height as she grows.
I have also mounted a UV bulb along the length of one wall due to the length of time she is likely to be indoors (because of how long our winters last here in the UK). Both this and her basking bulbs are on 12 hour timers and are active between 07:00-19:00.
I purchased thick, industrial plastic strips to cover the door to help keep in the heat for when I’m gaining access to attend to her. These are similar to the ones you find in large freezers. They’re fantastic, I really recommend them. They were purchased on eBay.
I’ve placed a concrete patio slab in the centre of the enclosure to feed her on which will help to keep her beak and claws trim. I place the food in a plant saucer to help keep this hygienic because the concrete slab would be difficult to clean. Water is provided in a similar saucer, and I’ve littered some grey slate beneath her basking spot which she loves sitting on because they retain heat and contribute warmth from beneath.
***drum roll please***
Here is the finished product …


Stage 5: Introduction.
So after 8 weeks of building and putting this together, and the countless hundreds of pounds I have spent, anyone experienced with tortoise will accurately predict what happened when I eventually introduced Quick to her new home … that’s right, she sulked. I did not see her for a solid week ?
With patience, gentle coaxing to her food and daily bathing, she eventually came out of her shell … ? thank you, I’m here all week!
I am pleased to say that after much exploration and curiosity, she seems to love her new digs. I have my happy, inquisitive and greedy little tortoise back ?
From my perspective, I am super impressed with how well it has performed maintaining my desired temperatures with minimal effort. So my advice for anyone looking to build an outdoor heated enclosure in a cold climate … INSULATE! And insulate well. I promise it will pay off in the long run
I am considering making a few adaptations I initially rejected the idea of a window pane in the door because I didn’t want to lose heat, but actually the structure copes so well that I don’t think it will matter. Especially if I invest in a double/triple glazed panel. I don’t like the idea of her not having any natural light so I this is definitely something I will do.
Anyway, apologies for the long post but if you’re anything like me, I enjoy seeing the different ways people house their tortoises - especially when faced with the challenges of varying climates.
As always, a huge thank you to all the experienced keepers on this forum that regularly give their time and expertise to the community. Both Quick and I are thankful ?