Under construction...literally the post and Frankie's house is under construction. Keep watching for updates...to the post and to Frankie's house.
To accommodate Frankie's increasing size and weight we decided to go really, really big with the hopes this may be the last installment of Frankie houses.
Goals: Fit the growing Frankie, handle the brief but cold coast temperatures, have an area that has the comfort and security of a sulcata cave, and keep him happier outside all winter long.
I wanted Frankie to be "in the light" during the day so he isn't so miserable during cold spells. When the temperatures are good I want Frankie can get outside without me having to escort him through our house.
I want my bathroom back.
Our solution is a greenhouse.
We decided on a Sunglo Greenhouse Kit Lean-To 5X7X7 (actual 5' 1.5" x 7' 6" x 7' &"), priced at just over $2,600 (his last Rubbermaid Frankie Cave cost just over $1,000 and lasted about five years). This was an investment and, hey, we can grow winter veggies.
The Sunglo included fan, thermostat and shutters. Greg planned to upgrade and customize the basic model for Frankie.
One cost savings is his Frankie cave that fit inside his Rubbermaid house will be moved to the greenhouse, his livestock heat mats will be reused, and a few of the electric gizmos.
The one big add on: radiant floor heating. We believe this will make the Frankie shelter a 100% suitable for year round habitation.
I may move in with Frankie. The greenhouse has electricity and WIFI.
Here is the installation

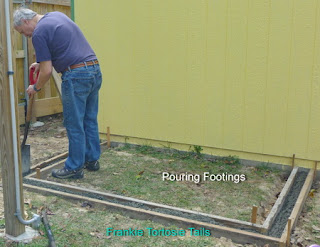
Footings as required by greenhouse specifications. Can't say much except Greg and I are doing all the work ourselves....mostly Greg. I make the sandwiches and keep Frankie away from the construction.
Once the footings were down and cured it was time to set up and install the radiant floor heat. Blue insulation was set on the bare ground in preparation for the 120 volt heating cables..

Greg picked up the parts for the radiant heat floor from a company called WarmlyYours. He assembled everything himself. Greg set and attached the heating cables evenly on a metal grid and installed electrics in preparation for the cement pour.
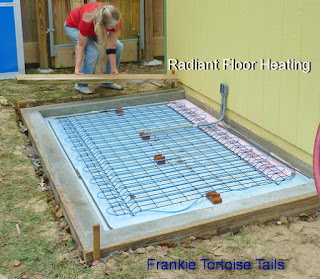
Grid with the heating cables are set on spacers on the insulation.

Once everything was in place the cement was poured and left to cure.
......a week later.
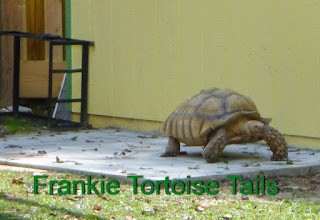
A week later the cement was cured enough to start the build. Frankie did a test walk to make sure it was hard.

Foundation brackets drilled into the cement.
Drilling into cement was about the hardest part of the whole installation. Picking up the right tools and bits helped but it was still difficult. That and keeping Frankie out. I finely just build a barricade.
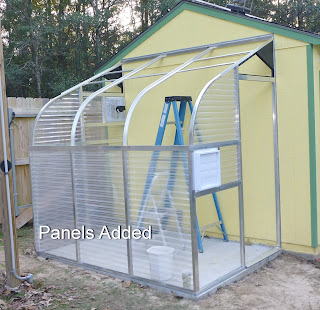
Installing the acrylic panels required two people. Glad I was already hanging around.
The outside panel is flat but the inside panels were ribbed. It took a day to get the frame up and the second day to get all the panels in place.

The open area is where Frankie's door will be installed.
Installing the people door, ventilation system, the thermostat, remote temperature control and cleaning up mess took a few more days.
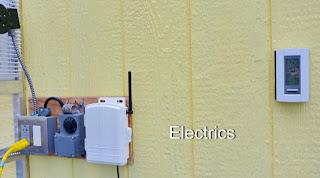
From left to right, ventilation fan, electrical outlet, integrated thermostat control, wireless temperature sensor, and radiant floor thermostat control.
The radiant floor thermostat is really cool. You can set the temperature you want the cement to be, AND you can set a temperature goal for the ambient air temperature. With Frankie we will not let the floor get hot just to warm up the whole greenhouse. If we need warmer air we will use supplement heat from an electric oil heater.
Once everything was installed it was time to clean the floor and put down a very thick coat of epoxy paint. Nothing fancy on the floor....it's gonna have hay, water, poop and pee all over it very soon.

Epoxy paint for garage floors.
Pictures make it all look easy and quick but there were so many more details.
If you have questions, please ask.
......there is more: install Frankie door, wall protection, place and upgrade Frankie cave, shelves...... hammock, TV, laptop....why not? I'll post here again when we've made more progress but until then you can watch for updates on Frankie's Blog.
View this on Frankie's Blog including updates: http://frankietortoisetails.blogspot.com/p/blog-page.html
To accommodate Frankie's increasing size and weight we decided to go really, really big with the hopes this may be the last installment of Frankie houses.
Goals: Fit the growing Frankie, handle the brief but cold coast temperatures, have an area that has the comfort and security of a sulcata cave, and keep him happier outside all winter long.
I wanted Frankie to be "in the light" during the day so he isn't so miserable during cold spells. When the temperatures are good I want Frankie can get outside without me having to escort him through our house.
I want my bathroom back.
Our solution is a greenhouse.
We decided on a Sunglo Greenhouse Kit Lean-To 5X7X7 (actual 5' 1.5" x 7' 6" x 7' &"), priced at just over $2,600 (his last Rubbermaid Frankie Cave cost just over $1,000 and lasted about five years). This was an investment and, hey, we can grow winter veggies.
The Sunglo included fan, thermostat and shutters. Greg planned to upgrade and customize the basic model for Frankie.
One cost savings is his Frankie cave that fit inside his Rubbermaid house will be moved to the greenhouse, his livestock heat mats will be reused, and a few of the electric gizmos.
The one big add on: radiant floor heating. We believe this will make the Frankie shelter a 100% suitable for year round habitation.
I may move in with Frankie. The greenhouse has electricity and WIFI.
Here is the installation

Footings as required by greenhouse specifications. Can't say much except Greg and I are doing all the work ourselves....mostly Greg. I make the sandwiches and keep Frankie away from the construction.

Once the footings were down and cured it was time to set up and install the radiant floor heat. Blue insulation was set on the bare ground in preparation for the 120 volt heating cables..

Greg picked up the parts for the radiant heat floor from a company called WarmlyYours. He assembled everything himself. Greg set and attached the heating cables evenly on a metal grid and installed electrics in preparation for the cement pour.
Grid with the heating cables are set on spacers on the insulation.

Once everything was in place the cement was poured and left to cure.
......a week later.

A week later the cement was cured enough to start the build. Frankie did a test walk to make sure it was hard.

Foundation brackets drilled into the cement.
Drilling into cement was about the hardest part of the whole installation. Picking up the right tools and bits helped but it was still difficult. That and keeping Frankie out. I finely just build a barricade.

Installing the acrylic panels required two people. Glad I was already hanging around.
The outside panel is flat but the inside panels were ribbed. It took a day to get the frame up and the second day to get all the panels in place.

The open area is where Frankie's door will be installed.
Installing the people door, ventilation system, the thermostat, remote temperature control and cleaning up mess took a few more days.

From left to right, ventilation fan, electrical outlet, integrated thermostat control, wireless temperature sensor, and radiant floor thermostat control.
The radiant floor thermostat is really cool. You can set the temperature you want the cement to be, AND you can set a temperature goal for the ambient air temperature. With Frankie we will not let the floor get hot just to warm up the whole greenhouse. If we need warmer air we will use supplement heat from an electric oil heater.
Once everything was installed it was time to clean the floor and put down a very thick coat of epoxy paint. Nothing fancy on the floor....it's gonna have hay, water, poop and pee all over it very soon.

Epoxy paint for garage floors.
Pictures make it all look easy and quick but there were so many more details.
If you have questions, please ask.
......there is more: install Frankie door, wall protection, place and upgrade Frankie cave, shelves...... hammock, TV, laptop....why not? I'll post here again when we've made more progress but until then you can watch for updates on Frankie's Blog.
View this on Frankie's Blog including updates: http://frankietortoisetails.blogspot.com/p/blog-page.html
 Congrats, and lucky Frankie.