Alex and the Redfoot
Well-Known Member
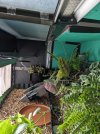
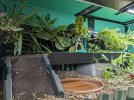
I've finally decided to share my efforts in making a closed chamber for my Redfoot out of plastic outdoor wardrobes.
This post is mostly "don't try this at home" but may give some ideas and work better for keepers with better DIY skills than mine")
The initial idea was to cut costs and corners and quickly make a water-resistant indoors box. Well, I have not completely screwed it up, but I tend to think now that building from scratch out of PVC sheets was easier and cheaper.
An approximate bill of materials (for a 6x3x2.5 feet enclosure):
1. Two IKEA Runmaro outdoor closets. 360USD (for both)
2. Two 0.2 inch plexiglass sheets (3x2 feet each) - 60USD
3. Polystyrene insulation sheets, 4x2 feet each, 1 inch thickness - 50USD.
4. Other stuff - duct tape, glue, PVC glass rails, screws and so on - 60USD
Some good points about the setup:
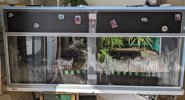
1. Humidity and temperatures stay high enough. 100 watt heater is enough to keep it warm (at 86F with 60F in the room), most heat is lost through the plexiglass windows.
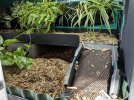
2. Closets come with shelves, legs and doors which can be reused to build ramps, hides and the second level. The back wall is made of a corrugated plastic (Coroplast), which is easy to cut and bend - it's great for borders and rails, lining and such. You'll have a lot of spare parts for reuse.
Now the list of drawbacks:
1. The closets are made of polypropylene plastic. And that sucks: it's soft (deforms permanently under its own weight) and nothing sticks to it (most glues and sealants are unsuitable to work with PP).
2. Since it's IKEA, the closet comes disassembled and there are many seams, holes and such, which should be water-proofed. Good duct tape sticks to dry plastic and seems to stay intact, but it's a lot of work. Otherwise you'll get condensate dripping from many, very suprising places (I still find wet spots here and there).
3. The most painful to water-proof is the seam between two closets and the backwall.
4. Sliding door rails need some creativity to fix them in place. I've used a plastic cable channel to make a "step" for the rails.
5. It's not really movable with substrate and all the stuff inside. My enclosure stands on the table and can be moved only with the table.
6. It's not cheap and not quick to build... Opposite to what I've hoped.
7. It's looks ugly comparing to PVC enclosures)))
Building instructions:
1. Assemble the closets, don't attach the legs, leave doors and shelves in the box. Install coroplast back wall only in one of them.
2. Turn them on the side.
3. Get a duct tape and seal any hole you can find
4. Install light and heating mounting brackets, railings and whatever you need.
5. Place enclosure sections where you want it to be (flat, water-resistant surface like floor or table). Stitch them together (using furniture bolts or metallic brackets, for example). Duct tape and insulate the seam between sections. And I still recommend to place a shower curtain liner, but perhaps I'm getting paranoid.
6. Place insulation panels. Typical polystyrene glue doesn't hold well on PP plastic. So using PVC or aluminium profile is better.
7. Finishing touches: install plexiglass in railings, put lights, heating and substrate.
Tips if you are still willing to try:
1. Put insulation panels from the outside. That saves a lot of time and way easier. Without insulation it doesn't hold the heat.
2. Avoid hanging anything from the ceiling (unless it's really lightweight or necessary).
3. When possible use aluminium profiles and railings to add rigidity to the enclosure.
4. Get a plexiglass sheet cut to the height of the enclosure. I had to make "stubs" in the top front part - they don't work nice (some air escapes through them).
5. Don't trust the glue, use screws wherever you can.
6. Mount anything you can (lights, heating) before assembling two closets together. Screwing something to the soft plastic walls is easier, when you have easy access.
7. Make a "dark room" test for unsealed holes - turn the lights off and put a bright light in the enclosure. Many surprises await you.
8. There are "hollows" in some closet details - fill them with polyurethane foam, to avoid condensate building up.
9. Get everything ready before adding substrate and tortoise. Any "I'll do it tomorrow" thing brings lot of pain.
10. There could be cheaper closet options or made of HDPE, don't stick to IKEA ones.
Short on heating and lightning:
1. I use two radiant panels (0.3x2 ft each) on a single thermostat. Rheostats which come with panels set to 65W, approximately. Power consumption is between 70-100 watt/hour.
2. One 22W Arcadia JungleDawn LED fixture for ambient lightning.
3. One 7W Arcadia ShadeDweller UVB light over gallery. This one I have from the previous low-height setup. It's not really necessary as tortoise has access to outdoors almost every day. Maybe I'll replace it with long "Natural Sunlight" tube simply to add UVA (have doubts about this).
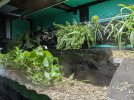
Green and blue walls inside the enclosure are the insulation plates. Just don't make the same mistake - don't waste your time and put them outside.
I'll be happy to add more details or photos if someone is interested.
P.S. - there is a tortoise on one of the photos
This post is mostly "don't try this at home" but may give some ideas and work better for keepers with better DIY skills than mine
The initial idea was to cut costs and corners and quickly make a water-resistant indoors box. Well, I have not completely screwed it up, but I tend to think now that building from scratch out of PVC sheets was easier and cheaper.
An approximate bill of materials (for a 6x3x2.5 feet enclosure):
1. Two IKEA Runmaro outdoor closets. 360USD (for both)
2. Two 0.2 inch plexiglass sheets (3x2 feet each) - 60USD
3. Polystyrene insulation sheets, 4x2 feet each, 1 inch thickness - 50USD.
4. Other stuff - duct tape, glue, PVC glass rails, screws and so on - 60USD
Some good points about the setup:
1. Humidity and temperatures stay high enough. 100 watt heater is enough to keep it warm (at 86F with 60F in the room), most heat is lost through the plexiglass windows.
2. Closets come with shelves, legs and doors which can be reused to build ramps, hides and the second level. The back wall is made of a corrugated plastic (Coroplast), which is easy to cut and bend - it's great for borders and rails, lining and such. You'll have a lot of spare parts for reuse.
Now the list of drawbacks:
1. The closets are made of polypropylene plastic. And that sucks: it's soft (deforms permanently under its own weight) and nothing sticks to it (most glues and sealants are unsuitable to work with PP).
2. Since it's IKEA, the closet comes disassembled and there are many seams, holes and such, which should be water-proofed. Good duct tape sticks to dry plastic and seems to stay intact, but it's a lot of work. Otherwise you'll get condensate dripping from many, very suprising places (I still find wet spots here and there).
3. The most painful to water-proof is the seam between two closets and the backwall.
4. Sliding door rails need some creativity to fix them in place. I've used a plastic cable channel to make a "step" for the rails.
5. It's not really movable with substrate and all the stuff inside. My enclosure stands on the table and can be moved only with the table.
6. It's not cheap and not quick to build... Opposite to what I've hoped.
7. It's looks ugly comparing to PVC enclosures
)))Building instructions:
1. Assemble the closets, don't attach the legs, leave doors and shelves in the box. Install coroplast back wall only in one of them.
2. Turn them on the side.
3. Get a duct tape and seal any hole you can find
4. Install light and heating mounting brackets, railings and whatever you need.
5. Place enclosure sections where you want it to be (flat, water-resistant surface like floor or table). Stitch them together (using furniture bolts or metallic brackets, for example). Duct tape and insulate the seam between sections. And I still recommend to place a shower curtain liner, but perhaps I'm getting paranoid.
6. Place insulation panels. Typical polystyrene glue doesn't hold well on PP plastic. So using PVC or aluminium profile is better.
7. Finishing touches: install plexiglass in railings, put lights, heating and substrate.
Tips if you are still willing to try:
1. Put insulation panels from the outside. That saves a lot of time and way easier. Without insulation it doesn't hold the heat.
2. Avoid hanging anything from the ceiling (unless it's really lightweight or necessary).
3. When possible use aluminium profiles and railings to add rigidity to the enclosure.
4. Get a plexiglass sheet cut to the height of the enclosure. I had to make "stubs" in the top front part - they don't work nice (some air escapes through them).
5. Don't trust the glue, use screws wherever you can.
6. Mount anything you can (lights, heating) before assembling two closets together. Screwing something to the soft plastic walls is easier, when you have easy access.
7. Make a "dark room" test for unsealed holes - turn the lights off and put a bright light in the enclosure. Many surprises await you.
8. There are "hollows" in some closet details - fill them with polyurethane foam, to avoid condensate building up.
9. Get everything ready before adding substrate and tortoise. Any "I'll do it tomorrow" thing brings lot of pain.
10. There could be cheaper closet options or made of HDPE, don't stick to IKEA ones.
Short on heating and lightning:
1. I use two radiant panels (0.3x2 ft each) on a single thermostat. Rheostats which come with panels set to 65W, approximately. Power consumption is between 70-100 watt/hour.
2. One 22W Arcadia JungleDawn LED fixture for ambient lightning.
3. One 7W Arcadia ShadeDweller UVB light over gallery. This one I have from the previous low-height setup. It's not really necessary as tortoise has access to outdoors almost every day. Maybe I'll replace it with long "Natural Sunlight" tube simply to add UVA (have doubts about this).
Green and blue walls inside the enclosure are the insulation plates. Just don't make the same mistake - don't waste your time and put them outside.
I'll be happy to add more details or photos if someone is interested.
P.S. - there is a tortoise on one of the photos