Moving On Up - To a Larger Enclosure

Maro2Bear

Well-Known Member
5 Year Member
Joined
May 29, 2014
Messages
14,714
Location (City and/or State)
Glenn Dale, Maryland, USA
Greetings All

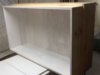
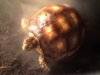
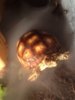
So it's about time for us to transfer our now six-month old Sully to a larger indoor enclosure so he can stretch out more, bask more, run around more, hide more, and of course eat more! He's been doing really well in his current enclosure, really large plastic container with custom built hinged lid with built in lights, CHE, UVB and misting units, but I think he will appreciate even more room to explore.

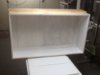
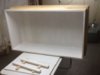
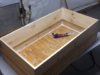
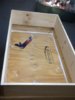
The base of this new enclosure is an old wooden shipping crate that I had from an overseas back to US move. It wasn't deep enough so I've now extended it to a nicer depth of about 20 inches. Width is about 36 inches and length is right about 60 inches. Since this was meant to originally protect an oil painting, I had to reinforce the bottom with a nice medium grade plywood. Today I've gone ahead and fastened the plywood in the base, and applied a silicone seal around the internal joints. Once the seals have dried the plan is to put down a layer of KILZ on all the internal wooden walls. Then I'll put a plastic layer on the floor and about 6 inches up the walls. Havent decided if I'll paint the external structure with Kilz or a more natural wooden stain. Of course a nice proper substrate will go on top of all that, peatmoss, sphagnum, coir, etc. and of course a new

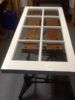
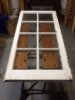
I was trying to think of a good looking yet functional lid that would provide us an easy view of Sully, and would easily open and close to keep the humidity levels high. Luckily, I didnt rush to any solution because I found the perfect old window frame for $20.00 on Craigs List. I need to redo the caulking around all the window panes, repaint, etc. but the frame fit my project without any modifications needed.

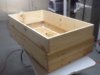
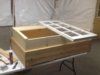
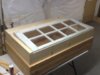
So, thats where we are today and I thought I'd share a few photos as the project develops. The last photo shows a dry fit of the pieces and about how it will look before painting or light fixtures.

Updates to follow.
 

Attachments

  • image.jpg
    image.jpg
    180.8 KB · Views: 224
  • image.jpg
    image.jpg
    184.3 KB · Views: 220
  • image.jpg
    image.jpg
    109.8 KB · Views: 218
  • image.jpg
    image.jpg
    107.3 KB · Views: 217
  • image.jpg
    image.jpg
    115.2 KB · Views: 225
  • image.jpg
    image.jpg
    176.8 KB · Views: 229

Maro2Bear

Well-Known Member
5 Year Member
Joined
May 29, 2014
Messages
14,714
Location (City and/or State)
Glenn Dale, Maryland, USA
Minor update following first coat of Kilz on the inside walls and bottom as well as the window/roof opening.

I'm including a few shots of our Sully exiting his hide through his warm misting "cloud" - I'm sure that he will enjoy the 3x more space in his new house.
 

Attachments

  • image.jpg
    image.jpg
    146.4 KB · Views: 158
  • image.jpg
    image.jpg
    140.6 KB · Views: 155
  • image.jpg
    image.jpg
    150.4 KB · Views: 157
  • image.jpg
    image.jpg
    102.3 KB · Views: 157
  • image.jpg
    image.jpg
    151.2 KB · Views: 155
  • image.jpg
    image.jpg
    106.6 KB · Views: 157
Last edited:

AbbyLee22

Member
5 Year Member
Joined
Oct 27, 2014
Messages
98
Location (City and/or State)
New Mexico
Is the enclosure tall enough to put lights inside? Or do you have a plan on having them outside the lid? Looks great so far!
 

Maro2Bear

Well-Known Member
5 Year Member
Joined
May 29, 2014
Messages
14,714
Location (City and/or State)
Glenn Dale, Maryland, USA
Yes, thanks for asking. It's deeper than my current set-up, and I have my lights and CHE inside that one. This new set-up will have a lot more surface area and provide greater temperature ranges, exercise area, sleeping and eating areas.
 

AbbyLee22

Member
5 Year Member
Joined
Oct 27, 2014
Messages
98
Location (City and/or State)
New Mexico
Yes, thanks for asking. It's deeper than my current set-up, and I have my lights and CHE inside that one. This new set-up will have a lot more surface area and provide greater temperature ranges, exercise area, sleeping and eating areas.

Awesome! I am excited for the 'after' pics :0)
 

Maro2Bear

Well-Known Member
5 Year Member
Joined
May 29, 2014
Messages
14,714
Location (City and/or State)
Glenn Dale, Maryland, USA
Just a quick update on the enclosure project, but I promise not to post pictures of the paint drying! Structure is now pretty much complete, double coat of Kilz has been applied to the inside, the old window pane has been painted and glazed. Need the glaze to thoroughly dry now and will give it a final coat of paint. The outside now has one coat of exterior grade latex paint, and will get a second coat later this afternoon.

I have all the pieces, just need to get it all put together and operational. Will let it operate a few days to ensure I have heat and lighting adjusted properly.

Heating: will be provided via a 150w CHE, centered from the ceiling
  • CHE will be regulated via thermostat
Lighting: will be provided via a ReptiSun 5.0 UVA/UVB bulb
  • Auxiliary Lighting provided via 150w and 40w incandescent bulbs
  • Lights controlled via automatic timers
Humidity: will be provided via ZooMed ReptiFogger (in current set up)

Temperature and Humidity sensors: Acurite remote/probe sensors

Water Bowl: via a large, shallow terracotta plant saucer, unglazed

Substrate: will be a mix of Canadian sphagnum peat moss and coconut coir
  • Bottom of enclosure will be protected with thick plastic tarp layer, up about 4-6 inches/sides
Hide: relocating current hide to the new enclosure

Pix: Here's a quick updated picture, between coats of paint.

image.jpg
 

Levi the Leopard

IXOYE
10 Year Member!
Joined
Oct 1, 2012
Messages
7,956
Location (City and/or State)
Southern Oregon
bigger is better :D good job

I don't think you'll need "wallpaper" like we discussed via pm. Just plant the heck outta that thing. I'd have so many potted plants scattered throughout, that the tort has to walk and weave through all of them ;)

Just some food for thought:

I wonder if the single 150watt CHE will be efficient enough. It might not heat the entire chamber and the high wattage might cause a very HOT spot under it which can still desiccate the top of the shell defeating part of the "high humidity" purpose.
Maybe you could consider 2 lower wattage CHEs. It will spread out the heat more evenly.

A closed chamber shouldn't need the humidifier. If the moisture has no where to go, then putting in more moisture will only create a soggy swamp. Keep an eye out for that..

I know you already have the stuff and your game plan is to test it.. so those are just my thoughts based on first hand experience.

I suggest you place one of the hydrometers directly under your CHE in the test phase. Then you'll get an accurate reading of the humidity level should the tort park it UNDER the CHE.
(Did you know my smooth Leopard was sleeping under a 100watt CHE for a few weeks...he is now smooth with 1 pyramid in the spot that was right under the CHE...)
 

Maro2Bear

Well-Known Member
5 Year Member
Joined
May 29, 2014
Messages
14,714
Location (City and/or State)
Glenn Dale, Maryland, USA
bigger is better :D good job

I don't think you'll need "wallpaper" like we discussed via pm. Just plant the heck outta that thing. I'd have so many potted plants scattered throughout, that the tort has to walk and weave through all of them ;)

Just some food for thought:

I wonder if the single 150watt CHE will be efficient enough. It might not heat the entire chamber and the high wattage might cause a very HOT spot under it which can still desiccate the top of the shell defeating part of the "high humidity" purpose.
Maybe you could consider 2 lower wattage CHEs. It will spread out the heat more evenly.

A closed chamber shouldn't need the humidifier. If the moisture has no where to go, then putting in more moisture will only create a soggy swamp. Keep an eye out for that..

I know you already have the stuff and your game plan is to test it.. so those are just my thoughts based on first hand experience.

I suggest you place one of the hydrometers directly under your CHE in the test phase. Then you'll get an accurate reading of the humidity level should the tort park it UNDER the CHE.
(Did you know my smooth Leopard was sleeping under a 100watt CHE for a few weeks...he is now smooth with 1 pyramid in the spot that was right under the CHE...)

Thanks for the comments Heather, appreciate your insights. I'm taking my time with the build and thinking the pieces, lighting, heat, etc. as it progresses.

I'm building it with three separate ceramic fixtures that can be swapped out as needed. If the one larger CHE doesnt cut it, I can add in my smaller one as well.

Tks!
 

Maro2Bear

Well-Known Member
5 Year Member
Joined
May 29, 2014
Messages
14,714
Location (City and/or State)
Glenn Dale, Maryland, USA
Weekend update, bottom and sides up six inches are now covered with a 5 mil medium grade tarp, water "resistant" and mildew proof. Along with another shot of the overall look of it when complete. Just making sure now that lid hinges don't interfere with location of lighting fixtures.
image.jpg image.jpg
 

Michael Twohy

Active Member
5 Year Member
Joined
Aug 7, 2014
Messages
289
Location (City and/or State)
Roseville, Minnesota
Weekend update, bottom and sides up six inches are now covered with a 5 mil medium grade tarp, water "resistant" and mildew proof. Along with another shot of the overall look of it when complete. Just making sure now that lid hinges don't interfere with location of lighting fixtures.
View attachment 109860 View attachment 109863
Looks really good :)
 

mike taylor

Well-Known Member
10 Year Member!
Platinum Tortoise Club
Joined
Oct 28, 2012
Messages
13,455
Thats funny the wife and I was talking about build a enclosure like that yesterday . We are going to be building one out of a wooden window frame . We seen it on pinterest.
 

Maro2Bear

Well-Known Member
5 Year Member
Joined
May 29, 2014
Messages
14,714
Location (City and/or State)
Glenn Dale, Maryland, USA
Thats funny the wife and I was talking about build a enclosure like that yesterday . We are going to be building one out of a wooden window frame . We seen it on pinterest.

Thats a great idea. The base frame for this enclosure was an overseas shipping box used to protect a large oil painting. I'm just rehabbing to fit my needs. Your window frame will serve the same for you. Good luck.
 
Top