turtlebean
Well-Known Member
Hey everyone! I am brand new to these forums and fairly new to the tortoise life. I have had my fair share of experiences with aquatic turtles, especially babies, but as I have learned, tortoises are very different. About a two months ago I really decided I was ready to commit to getting a tortoise, so I started doing my research. As well, I am very thankful for these forums and all of you who have so far supplied me with sufficient knowledge to start on this beautiful journey! I hope you enjoy my build thread, don't be shy to point out if you see I have done something wrong. As I have said, I am new to this and I am always open to learn!
When I started shopping for enclosures, all the Zoo Med tortoise enclosure boxes were popping up online for me to buy, but I think they just look so small and depressing. I have read that 4 by 8 is the MINIMUM space you want to provide a russian tortoise, so obviously I thought building my own box would be the best option. However, my loft, the room I will be putting my enclosure in has some furniture that is going to be moved out for more enclosure space, but in about a month or so. With this is mind, I have built a TEMPORARY enclosure for my tortoise to go into. Sort of a happy medium between the Zoo Med boxes they sell and my dream enclosure for my little guy. My tortoise is about 3 inches so I figured this would be okay for the time being, but obviously is in our best interest to expand his enclosure asap. During the month I will be constructing the second half of his enclosure so that all I will have to do is remove one of the walls of the current enclosure and piece them together to create MEGA enclosure. Sorry that is probably confusing to follow lol.
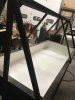
So, here I have the construction of my tortoise's temporary enclosure:

It is so far 2.5ft by 7 ft! This is as big of a box that can fit safely in my loft, but as I said I am adding a second half to this box soon. I cut all the wood and nail gunned it into place. There are no nails or sharp edges exposed in the enclosure. (Don't mind the hectic shop in the back lol, car work never stops!)
Next, I have sanded, vacuumed, blown out and now cauked all the seams, edges, and places needed to be filled in.

Next, I painted the floor and walls of the enclosure and added an overhead beam, with multiple supports to hang my lights and heater off of. I did scour the forms to see which types of sealants and paints were safe and which were not and made my choice based off of those factors. I am choosing not to go with a liner or plastic sheet below my substrate, which is why the I chose such a sealer and paint that would not mold or become defunct with any sore of moisture or humidity added.

I am adding two more supports in the back for my overhead beam (you can never be too careful!). And will be sanding and painting the outside of the enclosure as well. I am also adding some sort of safety so he can not try to crawl our of the walls of the enclosure. As well I kept in mind exactly which part of the wall I will be knocking down and replacing with the second half of my enclosure. It will be L shaped and will trace the wall of my loft, but all in due time!
I have also purchased some coco coir and cyprus mulch to put into my enclosure. As well as two slates, one for under the heating section and one for food. A little hide log for him, a hide box I'll be filling with sphagnum moss, a reptisun 22" MVB tube and a ceramic heater and thermometer (it never drops below 60 in my house but as said before, you can never be too careful). I will post pictures of the enclosure all filled up and set up when it is back at my house. As well, I'll be posting some pictures of my new little one when he arrives, in less than a week.
Hopefully this gives some inspiration to people trying to build their own enclosure and do not know where to start (me a week ago lol). As said before, this space is halfway temporary and I was just so excited to share with you guys!
-Julia R
When I started shopping for enclosures, all the Zoo Med tortoise enclosure boxes were popping up online for me to buy, but I think they just look so small and depressing. I have read that 4 by 8 is the MINIMUM space you want to provide a russian tortoise, so obviously I thought building my own box would be the best option. However, my loft, the room I will be putting my enclosure in has some furniture that is going to be moved out for more enclosure space, but in about a month or so. With this is mind, I have built a TEMPORARY enclosure for my tortoise to go into. Sort of a happy medium between the Zoo Med boxes they sell and my dream enclosure for my little guy. My tortoise is about 3 inches so I figured this would be okay for the time being, but obviously is in our best interest to expand his enclosure asap. During the month I will be constructing the second half of his enclosure so that all I will have to do is remove one of the walls of the current enclosure and piece them together to create MEGA enclosure. Sorry that is probably confusing to follow lol.
So, here I have the construction of my tortoise's temporary enclosure:
It is so far 2.5ft by 7 ft! This is as big of a box that can fit safely in my loft, but as I said I am adding a second half to this box soon. I cut all the wood and nail gunned it into place. There are no nails or sharp edges exposed in the enclosure. (Don't mind the hectic shop in the back lol, car work never stops!)
Next, I have sanded, vacuumed, blown out and now cauked all the seams, edges, and places needed to be filled in.
Next, I painted the floor and walls of the enclosure and added an overhead beam, with multiple supports to hang my lights and heater off of. I did scour the forms to see which types of sealants and paints were safe and which were not and made my choice based off of those factors. I am choosing not to go with a liner or plastic sheet below my substrate, which is why the I chose such a sealer and paint that would not mold or become defunct with any sore of moisture or humidity added.
I am adding two more supports in the back for my overhead beam (you can never be too careful!). And will be sanding and painting the outside of the enclosure as well. I am also adding some sort of safety so he can not try to crawl our of the walls of the enclosure. As well I kept in mind exactly which part of the wall I will be knocking down and replacing with the second half of my enclosure. It will be L shaped and will trace the wall of my loft, but all in due time!
I have also purchased some coco coir and cyprus mulch to put into my enclosure. As well as two slates, one for under the heating section and one for food. A little hide log for him, a hide box I'll be filling with sphagnum moss, a reptisun 22" MVB tube and a ceramic heater and thermometer (it never drops below 60 in my house but as said before, you can never be too careful). I will post pictures of the enclosure all filled up and set up when it is back at my house. As well, I'll be posting some pictures of my new little one when he arrives, in less than a week.
Hopefully this gives some inspiration to people trying to build their own enclosure and do not know where to start (me a week ago lol). As said before, this space is halfway temporary and I was just so excited to share with you guys!
-Julia R
")